Thursday, August 31, 2006

Water and Electricity

Yesterday it rained really hard out at the house, and the utility ditches filled up with quite a bit of water. Neither the propane or water pipe was layed, because the stuff floats! The propane guy called me today about it, and they're going to plan to come back on Tuesday - since Monday is a holiday - and try again. The weather forcast is for warm and sunny all weekend, so the ditches should be nice and dry by then.

The phone & cable don't float, so those will get layed in the ditch today or tomorrow, along with the electrical conduit. Mark says they'll just go ahead and get muddy - and they sure will, because when that clay gets wet it's a sticky soupy mess.

Indoors, the wiring continues. Here's Cary checking out the laundry room:
And here are the big spools of wire that they are pulling through to supply all the fixtures:

And here's where the fuse box is going to be. There's quite a waterfall of wires currently, it looks like some kind of art installation.

Everybody have a nice labor day weekend! I'll be back on tuesday with the next update.

Wednesday, August 30, 2006

Clawfeet

This weekend we got a chance to use Ross's sandblasting chamber to clean the rust off the clawfeet for the tub. It was amazing. In about an hour, they went from this:

To this:
Thanks are due to Ross, for letting us use his nifty machine, and to Cary for actually running the noisy bugger while I sat and chatted with Ross and Keron over a beer in the garden. :)

Electrical wiring continues at the house, but it turns out to be a really boring thing to take pictures of, even by my house-obsessed standards. Once they get the fuse box and all the switchplates and fixture backs in, I promise I'll put up some pictures.

More window framing went up yesterday, and should continue today. Utility connection lines for the cable, phone and propane are scheduled to go into the ditch today.

Tuesday, August 29, 2006

Ditches Dug

Lee the Equipment Guy came yesterday and dug all the utility ditches with the backhoe. There are two ditches, one from the NW corner of the property for the water, phone, cable and propane (all up by the shop) and one from the SW corner for the electric (down by the septic mound). The one up by the shop is where the leaky water pipe was found, so it is a muddy mess for the first 50' or so, as you can see: That little black box peeking out from behind the telephone upright is the new water shut-off and meter box.

Speaking of the water pipe, here's the new 'T' conection where the house line will attach.
The other ditch for the electricity was much drier, as you can see:
Those "wet" looking places are actually just spots where the hard-pan blue clay was scraped smooth by the hoe. Really, it's dry. I swear.

Here's another exciting thing- Steven got started putting the trim up on the windows. I decided we didn't need an exterior sill, so it's just a really simple frame, with a little overshot on the top peice to dress it up a tiny bit. I think they look great. :)
Inside, Frank's hard at work putting the electrical wiring in place, although things slowed down a little because Andy's wife delivered a baby boy (I think it was on Friady), and he's quite understandably taking a few days off work. Congratulations! :)

Monday, August 28, 2006

Utility Madness

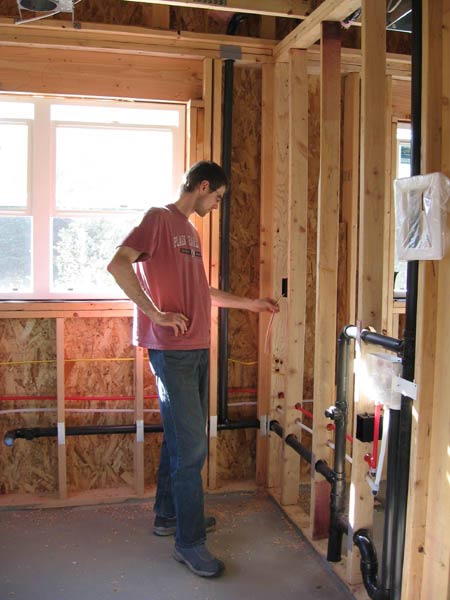
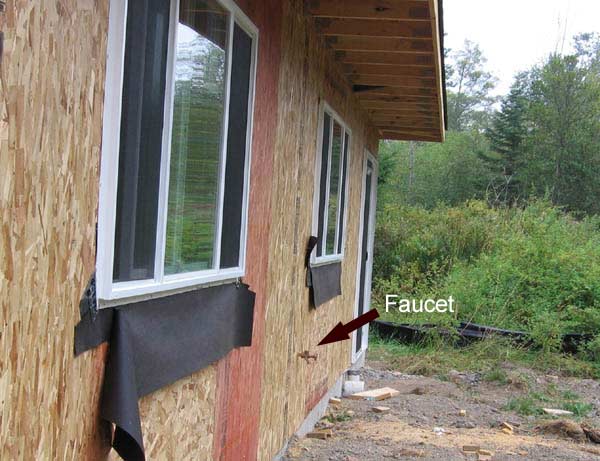
On Friday Cary and I met Mark out at the site in the afternoon to go over the connections for the utilities, as well as some other items. Bruce, my neighbor and the head of the Water Association, also came over to see if he could help solve the big mystery: where the #@$&% IS the water line? You see, we have a faucet in the shop, but we've never been able to locate a shut-off or meter or any other clue as to how the pipe was laid that conncets that faucet to the main water association line. The main water association line follows the driveway, which goes along the north edge of our property, then turns south and runs along the west edge. Since the shop is located in the NW corner of the property, the connection line could come either from the north or from the west... or for extra fun, it might zig zag or run diagonally. There are NO records, and although I've hunted around in all the bushes many times over the last few years, we've never found ANYTHING to indicate where the water line was buried.

Locating the water line recently became a bit more urgent, and not just because we need to connect into it for the house supply. The real problem was that we planned to ditch through the area by the shop to collect the phone, cable, and propane supply lines, and it'd be a real bummer to find the water line by breaking it with a backhoe. Especially considering that without a shut-off valve, we'd have to shut down water to the whole neighborhood while we fixed it.

Well, we all walked around on Friday, and still had no idea where the line was. Mark and Cary even dug a hole where we found an old stake in the ground which might have marked something - nothing. So I volunteered myself and Cary to dig around by hand on Saturday and try to find it.

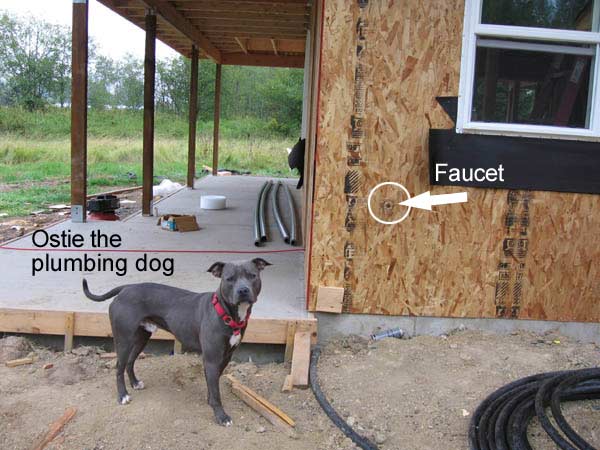
We started by digging about 20 feet away from the west wall of the shop, where the phone and electric lines were marked by the locator. Our reasoning was that if somebody was going to hook up multiple ulilities, they'd use as few ditches as possible. Also, the faucet inside the shop is right next to the phone jack. We found the phone line almost immediately, about 1' down. We kept going but the clay was hard and wet, looked like it had never been disturbed, and to top it off our hole started to fill up with water. Then the handle of the post hole digger broke. Gaah.

We widened our trench and continued digging, bailing the water out, but it was getting pretty miserable. We felt certain we'd gone down 24" (the standard depth for electric lines) but we'd found nothing. I started to doubt that the electrical line was where it had been marked. Not knowing where the water line is bad, but not knowing where the electrical line is worse.

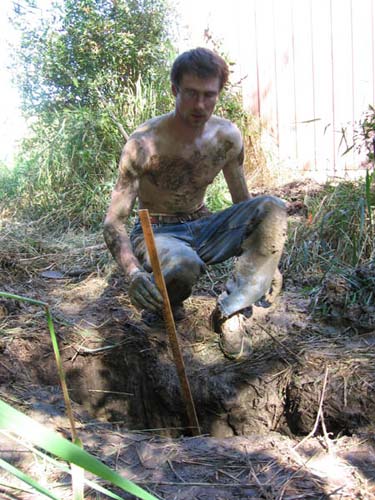
So, we changed tactics. We moved over to side of the shop, right outside from where the phone, faucet, and fuse box are on the inside. The reason we didn't start digging there in the first place is that the shop is build on a 1-2 foot thick pad of pit run, and we'd thought that it would be more difficult to dig through all the rocks than it would be in the clay. However, we were pleasantly surprised to find that a combination of pitchfork and shovel made relatively quick work of the pit run - and we found not only the electrical line but also the water line! Hooray! Now we just had to establish that the water ran straight west, and didn't turn and head north 5 or 10 feet from the building. Back to that first, nasty, water filled hole. Cary said "I guess this is what makes us homeowners, and not renters, huh?"
Well, down about another 6 inches, and yessiree, there was the water and the electric line. The water was coming in fast, flowing right down the pipe. I had a bad feeling about that, but mostly I was just happy we'd found it...
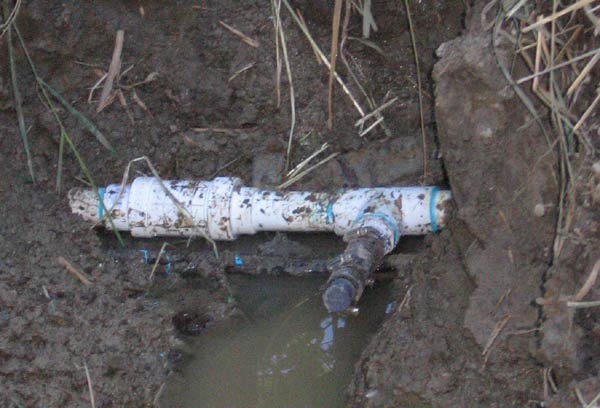
And sure enough, Mark called this morning from the site, where they had expanded the utility ditch and found the crappy shut-off that somebody jerry-rigged with a regular faucet valve and then buried. Apparently it's leaking pretty badly, due to the fact that it's not the sort of valve that you are supposed to use as a shut-off or bury in the ground at all, let alone for 15+ years. We have to put in a new valve and a meter anyway, so it's not going to cause any additional expense, I'm just glad we found it now and not sometime next year!

Friday, August 25, 2006

Stove Pipes Installed

Check out our new roof-mounted post-combustion exaust conveyances (RMPCECs). Some people call them stove pipes. :)
Here's a shot of the stove pipes going up into the attic, check out those moves! I wrote a while ago about the issues we were running into with the changed dimensions of the wood stoves, and we though that we were going to have to expand the chase into the middle bedroom a bit to make up for the repositioned stoves. Thanks to some creativity and a lot of skill (other people's skill, not mine!) we were able to keep the chase in the same place and just do all the compensation up in the attic. Yay!

Here's the man who put it all together - Jeff from Barron Heating. He and his coworker whose name and picture both escaped me did a great job - Thanks guys! Behind him you can see the air intake which will bring fresh, outside air to the stove so that we don't asphixiate and die when we have a fire. Above the ladder you can see the stove pipes coming through the ceiling. For now they will stay like that, just tubes in space, because the stove itself won't be installed for quite a while yet.

Thursday, August 24, 2006

Rust-Removal Miracle Breakthrough

I can hardly describe how wonderful the electric 4.5" disk grinder that Bo loaned me (Thanks, man!) is for taking the rust and corrosion off the underside of the clawfoot tub. It's truly miraculous the difference POWER makes over my original "wire-brush-by-hand" technique. Here's a shot where you can see what we're dealing with: on the right is the untouched rust, and on the left you can see what a difference just 10 minutes with the grinder makes. (This would have taken AT LEAST 2 hours with the hand brush - probably more.)
Safety glasses, a dust mask, gloves and earplugs are all essential for this job. The little wires come shooting off the brush pretty frequently, and while they only sting a bit hitting arm or leg skin, they'd really do a number on an eyeball.

Cary took a turn with the grinder as well. In just an hour or so we were able to do about 1/3 of the tub! We'll have to figure out something else for the area under the curved rail of the tub though, because the grinder doesn't really fit. I'm planning to swing by Hardware sales this evening to look for some other shape of brush attachment, because I desperately don't want to resort to the wire brush again. I guess once you've tasted power you just can't go back!

Visitors & Notes from Mark

Last night when I was out grinding the bathtub (more on that in a bit) My uncle Fred stopped by to see the house for the first time. It was nice to see him and to show him around the place (and it was nice to hear all his compliments on it too! smile.)

A little bit later Lori and Allen - neighbors immediately to the east - came by for a look at the progress as well. I sure do enjoy giving tours! Allen was full of questions and enthusiasm as usual - he's such a fun kid, and he's probably the second-most excited person about this whole project, after me. I had a nice visit with them, and again enjoyed all the compliments from Lori. :)

I spoke to Mark a little earlier today, and it sounds like there's a lot going on today! Andy, the electrician I met yesterday, and Frank, his partner, are out there puting the first fixtures in place. Somebody from Barron Heating is working on the wood-stove-pipes, and somebody else is locating the utilities and figuring out the connection points. I'll get out there after work today, and you can bet there'll be pictures here tomorrow...

Wednesday, August 23, 2006

Electrical Planned

I met this morning with Robin, Mark, and Andy the electrician and went through the house, room by room, deciding where all the fixtures, switches, phone jacks, and all that other good stuff should go. It was a lot of fun. (I know - I need to get out more!)

In case you're wondering, this is what the electrical plan currently looks like: a bunch of pencil notations, circles and scribbles drawn on the floor and walls. In about a week though, there'll be all kinds of fixtures and wires for me to take pictures of! I can hardly wait...
We're mostly having recessed cans for lighting, indoors and out. In addition to the cans there will be a couple of pendant lights over the bar, a surface-mounted light in each of the bedrooms, the laundry room, and the office, a couple of sconces on the stairs, a triple-bulb fixture over each bathroom vanity, and a wall-mounted fixture by each of the exterior doors.

Outlet locations and numbers are mostly determined by Code, but in a few locations I specified extra outlets or specific locations. There will be an exterior outlet on each side of the house, as well as one under the soffet for plugging in xmas lights or summer lanterns.

The switches will mostly be very intuitivly placed, except in a couple of locations where the plumbing or framing made it more sensible to relocate the switches a little bit. A lot of the task-lighting will be switched separately from the main area lighting, so it can be turned on and off as needed. Robin also made sure that we didn't stick switches in the middle of any nice walls that would otherwise be good for art or furniture placement. :) (L-R: Andy, Robin, Mark)

In order to properly plan the kitchen lighting, Mark drew the outlines of the cabinets and appliances on the floor. Robin also had the cabinet elevation from the cabinet shop so we could work around the upper cabinets. It's important that the lights are placed so that a person working at the counter won't shade their own workspace - that would be so anoying! This was the first time I'd seen the elevation, and I really liked the look of it.
Yesterday the vents were installed for the bathroom and dryer vents. Right now from the inside they kind of look like a giant space alien spider or something. The tubing is wrapped in a layer of fiberglass insulation enclosed in a black plastic tube. The insulation is necessary (I asked Mark about it) because the warm wet air could condense otherwise when it gets up into the unheated (aka cold) attic space. Wouldn't want that!
Here's a view of the vent covers from the outside.

The first load of siding (Hardy Plank), trim boards, and tar paper were delivered to the site this morning as well. They should start going up tomorrow.

Tuesday, August 22, 2006

Wood Cook Stove Research

Since I didn't get out to the site to take any pictures last night, I though I'd post a bit more about my wood cook stove. Here's a picture of the oven door, which has "Monarch Malleable" printed in a stylish blue & black flourish across the white enamel. Monarch Malleable stoves fueled by wood, gas, coal and electricity seem to be pretty common, according to the internet - lots of the newer ones (1950's or so) are listed for sale. The older ones (like mine) don't show up so often, although I did find a similar one on E-bay (no historical info available there, I'm afraid).
As you can see from the picture below (showing the ash clean-out door and other front-left pannels) the stove was made by the Malleable Iron Range Co. of Beaver Dam, Wisconsin. 4556N looks like a model number, or at least some kind of clue to identifying the stove. And, in case it wasn't clear what fueled this stove, "WOOD" is helpfully emblazoned across the top pannel.
Seems like these should be enough clues to find out all there is to know about this stove, right? Well...

I've been working my way through the internet for some time now, trying to learn what I can about the history of this stove - when it was made, by whom, what features set it apart from other stoves, etc. The first thing I learned is that the people who know this sort of stuff are - putting it kindly - not very internet savvy. With a few exceptions, most of the sites devoted to antique wood stoves are a mess. And, since the Malleable Iron Range Co. went bankrupt in 1985 there is very little info online about them. (The info I did find mostly related to the Superfund clean-up of their abandoned factory in Beaver Dam. Nice.)

One of the things I'd REALLY like to know about the stove is when it was made. Having perused all the antique cookstove pictures I could find (a nice assortment can be found here), my guess is that it dates somewhere between 1900 and 1920. Mine isn't as ornate as most of the stoves that are featured on vintage stove sites, which doesn't surprise me at all. My ancestors didn't really go in for frilly gew-gaws any more than I do (thank goodness). Plain and practical, efficient, economical, sensible and sturdy - these are very "Pobstian" qualities. :)

One of the better sites I've found is for the Homestead Vintage Stove Company, which happens to be located in Skykomish, about 100 miles from Bellingham and right on the way to my parent's place. I'll have to stop in and see their showroom sometime on my way over Hwy 2. I called them to see if they could give me any additional information about the stove, but their showroom is only open on Fridays and Saturdays. I'll call back...

Monday, August 21, 2006

Upstairs Concrete Poured

As promised, the upstairs concrete was poured on Friday and cured over the weekend. It looks great. Thanks to Robin, I even have a picture of the pour in progress:

The bedrooms, looking North (compare to same view in previous post with only the tubes laid):

Aaaand looking back the other way, everything so nice and smooth:
The radiant manifold in all it's concrete-entombed glory:
Next steps are electrical wiring rough-in, gas piping, and then insulation and sheet rock (woo!). I'm scheduled to meet the electrical contractor Wednesday morning to go over locations for light fixtures, outlets, switches, phone jacks, cable connections, and all that good stuff. This week also may see the exterior siding, which will be followed by trim and even doors, not to mention installing the three bedroom dormer windows. I'll keep you posted...

Thursday, August 17, 2006

Totally Tubular

As promised, the tubes are laid in all the upstairs rooms. As I mentioned previously, we'll be pouring(on Friday) a 1 1/2" layer of lightweight gypsum concrete over the tubes and that will bring the floor up to its nearly finished level.
For the finished floors, there'll be carpet up the stairs, in the hallway and in each of the three bedrooms. The Laundry room and Bathroom will have marmoleum (a non-vinyl, more-or-less natural linoleum) floors. The manifold is located in the closet of the middle bedroom. (Appologies again to our future kid who gets stuck with that room!)
The tubes used for the radiant heat are hePEX which is supposed to be the good stuff - made specifically for radiant installation. It has an oxygen barrier in it, which is important because it means that the boiler won't rust out, as happened to my co-worker Steve. I don't understand the chemistry behind it, but I DO understant that while the hePEX costs a bit more on the installation than tubing that isn't oxygen-blocking, it isn't as much as repairing the whole system in a few years!

You can also see in this shot that the tubing loops into the closets, just enough to keep the chill out. It does not, however, run under the washer, dryer and cabinets to be built into the laundry room. It's really nice how this system puts the heat where it will be most needed.

Wednesday, August 16, 2006

Tubing Today

They're laying in the radiant tubing for the upper floor today! The lightweight concrete is scheduled to be poured on Friday, and then I expect it will need a day or so to set up over the weekend and then be ready for further work to procede by Monday. Exciting stuff - I'll get some pictures tonight for posting tomorrow.

In the meantime, Mark & Barron Heating are still working on the adjustments necessary to fit the wood stove into the space required. Robin's scheduling a site visit with the electricians for next week, so we can go over the positioning of all the fixtures, switches, outlets, phone jacks, and myriad other wiring things with them. And I'm thinking it might be worth it to get a wire brush attachement for Cary's electric drill, because otherwise its going to take me a month (or more) to brush all the rust off the bottom of the clawfoot tub by hand. :)

Tuesday, August 15, 2006

Upstairs Radiant & T-stat wiring

Yesterday Barron heating installed and connected the manifold for the upstairs radiant heat. Well, connected it to the downstairs one, at least. The tubes haven't yet been layed out on the floor yet, but if you notice in this picture, all the walls have a double bottom sill. That's because we're going to pour a 1 1/2 inch layer of lightweight concrete over the tubes, once they're installed (today, hopefully). Even the toilet connector thing is raised up in anticipation of the pour. The concrete is to give the radiant enough thermal mass to really work efficiently. It's not as good to just run hot water under plywood and carpet, the heat would disapate too quickly.

They also strung the wires for the thermostats. They aren't conected to anything yet, but it's still our very first wiring, so that's pretty cool. There will be a thermostat in the main living area, the office, and each of the bedrooms.

Monday, August 14, 2006

Big Busy Weekend

I FINISHED DIPPING ALL THE SHINGLES! YEAH!

Dad delivered my old wood cook stove and the clawfoot tub this weekend. Luckily, Ross and Keron happened to stop by to see the house just as Dad arrived to unload them, so Ross gave us a hand with the heavy lifting. (BIG THANKS!) Both the stove and the tub need to be cleaned up somewhat, although they are in really good condition overall. Some quality time with a wire brush, cleanser, and brillo pads is in order. Here's what the stove looks like:
This was my Great-grandpa's cook stove, it came out of the original Pobst Place homestead in Plain. You can see one of his "improvements" on it - that weird little light fixture attached to the underside of the right warming oven. I'll be removing that. I got this stove when my Great-Aunt Margarite sold the farm and moved into an assisted living facility several years ago. Dad coated it thoroughly with WD-40, wrapped it up in plastic and since then it's been sitting in his barn waiting for me to build a house to put it in.

The bathtub also needs some TLC. It's dirty on the inside (it's been out in the pasture watering the cows) but some Bon Ami should take care of that. We have all the feet, although they could use some sand-blasting. Handily, Ross has a sand blasting chamber, and he just got a new bag of black sand. So I'll be taking the feet over to his place one of these days to take advantage (probably not for the last time) of his tools and expertise. Dad welded the tabs on the back of two of the feet that were cracked, so it's all set to re-assemble once I scrub off the rust and re-prime the underside. There are a few nicks in the enamel as well, but they are small so I should be able to patch them myself.

I guess it's lucky that Dad was able to bring these over this weekend. Otherwise I wouldn't know what to do with myself now that the shingles are done!

Thursday, August 10, 2006

Fun with Wood Stoves

So we've run into a little problem with the wood stove. Not the old wood cook stove, but the new wood stove. We expected problems with the old cook stove - there's just no way it meets modern standards and stuff, but we can work around that since it meets all the criteria for "antique". But we didn't expect any trouble from the new, modern wood stove. Here's the deal: When we drew up the design, we alotted space for a stove such as this one: which, as you can see, has the door on the narrow end. The stove will go more or less in the center of the house, which places it at one end of the living/dining area. To the right of the stove is the "hall" (really just a small open space) which connects the bathroom and office doors to this main space, and to the left is the wider opening into the kitchen. So far so good.

BUT! It turns out that the state of Washington forbids the use of this type of stove in new construction. If we were remodelling an existing home, we could have one. They carry them in the showrooms and show them at home shows, giving us the mistaken idea that we could have one like this in our house. It has something to do with the fact that this style of stove, the open-on-the-short-side stoves, can't be equiped with an outside air supply. They just use the air out of the room. The state is worried that we will burn up all the air in the house and die. Or something like that. I guess they don't concern themselves about the fate of all those asphixiated remodellers, just the owners of newly constructed homes. It's touching.

So, we have to get a stove like this one, which opens on the long side of the rectangle. Stylistically, I'm unconcerned - it's still a very attractive and efficient wood stove. However, the change in dimensions is causing some headaches: we can't very well just let it stick out extra-far into the hallway in front of the bathroom door, so we have to move it over to the left, which means the stove pipe doesn't line up with the chase that they framed into the closet of the upstairs bedroom. So we'll have to bump the chase out into the bedroom a ways - probably 6" to a foot. (Sorry future second child, for making your bedroom even smaller compared to your older sibling's!). There are also some questions about exactly WHERE the outside air supply will come into the house, and the route it will take to get to the stove. And there might need to be some extra elbows in the stove pipe to line it all up with where it needs to exit the roof. Whew!

Mark, Robin, and the guys from Barron Heating are working up a solution, and I have every confidence that they'll come up with one in no time. Probably a very elegant and beautiful solution, such that once it's all built and in place no one will ever guess that we had any problem at all with this stuff. :)

Wednesday, August 09, 2006

The Rain is My Fault

Yep, you know how in yesterday's post I said "bring on the rain"? Apparently I have more influence over the weather than I knew. Sorry about that, I'll try to be more careful in the future. Promise.

Yesterday the plumbing was roughed in, including the outside hose bibs. Aparently it's only a faucet if it's inside the house. Outside, it's a bib. Who knew? I'm going to keep calling them faucets though. In fact, I've labeled them as such on the pictures below, just out of spite for the correct usage of the english language. This one is on the south side of the house, below the kitchen window.
This one is by the front door. I decided you didn't really want to see a picture of the one by the sunroom door. :)
Inside the house plumbing was nearly finished when I got there, Derek the plumber and his dog Ostie (short for Osteoporosis - No,I didn't ask why) were just finishing up the hook-ups for the upstairs shower/bath insert. In front of and inside the wall framing is the hook-up and drain for the washer and dryer.
The tubing used for the water delivery is a flexible plastic stuff, much easier seeming to work with than the old copper pipes. The red is for hot water, the white is for cold water.
Ostie has a big old bone over there, which he really wanted to share with me.

Tuesday, August 08, 2006

Miscellaneous Monday

First, here's a picture of the finished roof, doesn't it just look marvelous? The roof vents and flashing and everything are all done. Bring on the rain!
The siding didn't get started yet, but they finished up some odds and ends on the framing and removed the last bits of bracing from the interior walls. Mark called earlier today and he's got the plumber out at the site, they needed to know where I wanted the outdoor hose faucets roughed in. I asked for three: one on the NE corner of the sunroom, one on the west wall near the front door, and one in the middle of the south wall. I should be able to get a hose to just about anywhere I need one - in the area around the house at least - from those three points.

Cary and I dipped a bunch more shingles last night, we're now a bit over 2/3rds done. Whew! I have to pick up some more stain, we're essentially out. Robin's already called it in, so I just have to stop by the paint store and pick it up. I'm hoping to get through the rest of them this week and weekend, so they can start going up on the house next week.

Monday, August 07, 2006

Windows and Roofing

Friday was a big day - the windows were installed (most of them, anyway)and the roofing began. Cary had the day off work so he went out about noon to take a look. The roofing was off to a great start.
After I got home from work we went out again, about 7:30 pm. The roofing crew was STILL going strong! They had about 1 1/2 hours of daylight left, and it looked like they planned to make the most of it. They were men on a mission. I don't think they could possibly have finished it that night (we were out of town for a wedding this weekend, so I don't know for certain) but there is no doubt at all that the roof will be done by the time I see it tonight!
As I mentioned above, the windows are almost all installed. They left the three bedroom dormer windows out, presumably because that gave the roofers easy acess to the porch roof. The windows look great. The brand is Jeld-Wen and they are vinyl with Low-E glass. They feel substantial, yet open and close easily. Here's Cary's self-portrait, reflected in the window of the living room:
The curved alcove above the fancy north bedroom window has also been framed in, and I think it's going to be really nice. You can't see it in this picture because of the strong backlighting, but that's what I'm pointing at. :)

Thursday, August 03, 2006

Plumbing Update

I just got the quote on the plumbing fixtures that I picked the other night, and we're under budget! We've still got to decide between two different kitchen faucets (spout pullout sprayer vs. competely separate sprayer) and four different kitchen sinks (good sized, big, huge and gigantic), but even if we go with the two most expensive of each we'll come out $100 under. If we go with the two cheapest of each we'll come out about $270 under. So either way it's going to work out fine, in spite of the expensive clawfoot tub fixtures. Woo!

Further update: We've made our Kitchen sink & faucet choices. The lucky winners are pictured below:


Click on the pictures for links to the manufacturer's websites